
The fastest visibility gains come from five changes: a professional headshot, a headline rewritten around keywords and value, an About section that hooks in the first 300 characters, three pinned skills that match your target role, and one week of consistent activity.
Start by editing your headline right now. If your career situation is complex, a professional LinkedIn profile optimization service can shortcut the process.
TL;DR:
- Updating your headshot and rewriting your headline with targeted keywords can significantly increase profile views within days.
- Crafting a concise, engaging About section that highlights your results and specific audience appeals more to recruiters than long descriptions.
- Incorporating measurable achievements and relevant keywords throughout your Experience and Skills sections improves search ranking and credibility.
- Regular activity, such as posting, commenting, and personalized connection requests once a week, boosts visibility in LinkedIn’s algorithm over time.
- Using structured settings for Open to Work and optimizing your profile URL enhances discreet job searching and professional branding.
Table of Contents
- What is LinkedIn profile optimization and where do you start?
- How do you write an About section that gets read?
- How do you turn job duties into measurable LinkedIn results?
- How much LinkedIn activity actually moves the needle?
- Which ‘Open to Work’ and privacy settings should you use?
- Which audit tools are worth your time?
- How soon will you see results after optimizing?
- How do you customize your LinkedIn URL for better branding?
- How do you request LinkedIn recommendations that actually help?
- How do you use multimedia to strengthen your experience section?
- Where else should keywords appear beyond the headline?
- Which underused profile sections deserve more attention?
- How should you tailor your profile for a specific industry or role?
- When should you DIY your LinkedIn profile versus hiring help?
- How Professional Resumes can help you finish the job
- Sources
What is LinkedIn profile optimization and where do you start?
LinkedIn profile optimization is the practice of editing every visible field on your profile, your photo, headline, About section, experience, and skills, so that both human recruiters and LinkedIn’s search algorithm read you correctly and rank you higher. It’s not a one-time polish. It’s an ongoing discipline that treats your profile like a landing page: every element either earns a click or loses one.
Two fields carry outsized weight. Your headshot and headline appear everywhere your profile is referenced, in search results, in comment threads, in connection requests, and recruiter searches lean on both harder than most professionals expect. Profiles with a professional photo receive noticeably more views and messages than those without one, and profiles that reach LinkedIn’s “All-Star” completeness status show up in far more recruiter searches, with the headline carrying disproportionate weight in that ranking.
Here’s what to fix in the first 15 minutes:
- Swap a casual or outdated photo for a well-lit, front-facing headshot with a plain or blurred background, cropped from the shoulders up.
- Add a banner that reflects your industry or current focus, not the default LinkedIn blue.
- Rewrite your headline using this formula: role, core expertise, and the outcome you deliver (e.g., “Senior Financial Analyst | FP&A & Forecasting | Helping SaaS Companies Cut Budget Cycles by 30%”).
- Place your top two or three keywords, the exact terms recruiters search, within the first 40 characters of your headline, since mobile truncates the rest.
- Check your banner text is legible on both desktop and mobile before you save it.
A photo update and a headline rewrite together often produce the fastest visible jump in profile views, sometimes within days. That’s the “quick win” most people skip because it feels cosmetic. It isn’t. It’s the first filter a recruiter applies before reading a single line further.
How do you write an About section that gets read?
LinkedIn’s About field holds up to 2,600 characters, but almost nobody reads that far. The section that gets read is the first 300 characters, the portion visible before a reader has to click “see more.” That’s your hook, and it has to work like the opening line of a cover letter, not a résumé objective statement.
A well-built About section follows a repeatable structure:
- Hook — one sentence that names the problem you solve or the outcome you’re known for.
- Problem you solve — a short line connecting your expertise to a business challenge your target reader recognizes.
- Proof — one or two metrics that back up the claim (revenue grown, costs cut, teams built, projects delivered).
- Who you help — name the industry, company size, or role you typically work with.
- Call to action — a single, clear next step: “Open to conversations about supply chain leadership roles” or “Message me to discuss consulting availability.”
Coursera’s guidance on writing summaries confirms this: strong LinkedIn summaries hook readers within the first 300 characters and read like a short narrative rather than a list of job titles. Keep paragraphs to two or three sentences. Use a bullet or two if you’re listing specific achievements, but resist turning the whole section into a list, since concise, scannable About sections built from five to ten short paragraphs read far better on mobile than dense blocks of text.
For keyword selection, open a relevant job posting in your target field and note which skills and titles repeat. Then type a few of those terms into LinkedIn’s search bar and see what autocomplete suggests. Those are the terms recruiters are typing too.
Pro Tip: Write your About section for one specific reader, a hiring manager at a mid-size logistics company, a partner at a boutique law firm, not a general audience. Specificity reads as confidence, and it also happens to match more precisely with recruiter search terms.
If you want a structured walkthrough on narrative and voice, this guide to writing a career summary covers the same hook-proof-CTA logic applied to résumés.
How do you turn job duties into measurable LinkedIn results?
Recruiters skim Experience entries looking for evidence, not adjectives. The formula that works is action plus scope plus metric: what you did, how big the effort was, and what changed because of it.
Compare these two lines for the same job:
- Weak: “Responsible for managing client accounts and improving satisfaction.”
- Strong: “Managed a portfolio of 40 enterprise accounts, reducing churn by 18% over 12 months through a revised onboarding process.”
A few practical rules for this section:
- Keep three to five bullets per role; cut older or less relevant positions down to one line.
- Prioritize your two most recent roles and any position most aligned with your target job, even if it means trimming earlier experience.
- Lead each bullet with a strong verb (built, negotiated, launched, reduced), never “responsible for.”
- Prune your Skills section down to the 15 to 20 terms that actually match your target roles, then pin the top three so they display prominently on your profile.
- Consider taking a relevant LinkedIn Skill Assessment; a badge next to a skill adds a layer of verification recruiters notice.
Recommendations reinforce all of this. Request them from people who can speak to a specific result, a manager who saw the churn reduction, a client who felt the impact, rather than a generic colleague. Ask right after a project wraps, while the details are fresh, and offer a short reminder of what you’d like them to mention.
How much LinkedIn activity actually moves the needle?
Consistency beats virality. A profile that posts or comments regularly signals relevance to LinkedIn’s algorithm far more reliably than one that occasionally chases a viral hit, since active profiles show stronger visibility signals than dormant ones with an otherwise polished setup.
A realistic weekly routine:
- Post one piece of original content per week, a lesson learned, a short case study, a reaction to industry news.
- Comment thoughtfully on five to ten posts per week from people in your target industry or company.
- Send two or three personalized connection requests weekly to people in roles or companies you’re targeting, referencing something specific about their work.
- Reply to every comment on your own posts within 24 hours to keep the engagement loop active.
A micro-case-study post might read: “Cut our reporting cycle from 5 days to 2 by automating three manual steps. Here’s what we changed.” Short, specific, and results-oriented posts like that tend to outperform generic career updates. None of this requires hours a day. Fifteen to twenty minutes, four or five times a week, is enough to keep your profile active in the algorithm’s eyes.
Which ‘Open to Work’ and privacy settings should you use?
Your settings determine who actually sees your job search status, and getting them wrong either broadcasts your search to your current employer or hides you from recruiters entirely.
- Choose between the public Open to Work banner (visible to everyone, including your current employer’s network) and the recruiter-only setting (visible only to LinkedIn Recruiter users), depending on how discreet your search needs to be.
- Fill in exact job titles, locations, and employment types in your Open to Work preferences, since recruiter search tools filter directly on these structured fields rather than on freeform profile text.
- Turn on “Profile visibility off LinkedIn” if you want your profile indexed by Google and other search engines, useful for personal branding and executive visibility.
- Set your industry and location fields precisely; vague entries like “various” or “remote” get filtered out of narrower recruiter searches.
- Recheck all four settings every time you change job titles or relocate, since outdated fields quietly remove you from searches you should be appearing in.
Which audit tools are worth your time?
Four categories of tools help you benchmark a profile: built-in profile strength scanners, AI headline and summary generators, browser extensions that flag missing sections, and a plain manual checklist you run yourself. Each has a different job.
Use LinkedIn’s own profile strength indicator as a baseline, but don’t chase a perfect score. Treat the score as a checklist, not a target.
AI drafting tools are genuinely useful for a first pass on your headline or About section, giving you sentence structures and keyword ideas you might not think of. But AI drafts need human editing to preserve your actual voice and to make sure every metric and claim is accurate. Never publish an AI draft unedited.
A practical self-audit routine:
- Spend 10 minutes on photo and banner.
- Spend 15 minutes rewriting your headline and the first two lines of About.
- Spend 20 minutes tightening your top two Experience entries.
- Spend 10 minutes pruning and pinning Skills.
- Spend 10 minutes checking Open to Work and visibility settings.
Pro Tip: Run this audit on a 30 to 60 minute clock and stop when time is up. A partially optimized profile you actually finish beats a “perfect” one still sitting in drafts three weeks later, and this exact 30 to 60 minute routine is what most experienced profile writers use themselves.
How soon will you see results after optimizing?
Search appearances tend to move first, often within a few days of a headline or keyword change, since LinkedIn’s indexing reacts quickly to updated text. Profile views usually climb over one to two weeks as the change circulates through search and suggested-connection algorithms. Connection requests and inbound messages are the slowest metric to shift, typically taking two to four weeks to show a clear pattern.
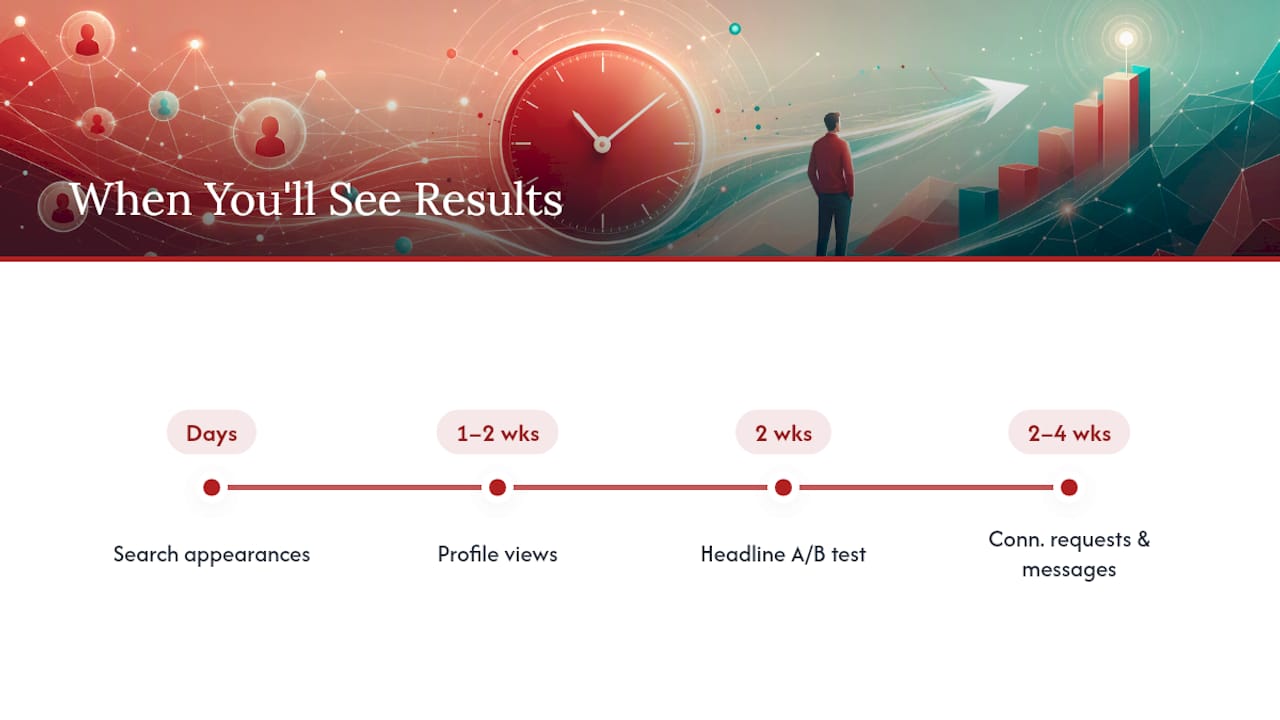
A/B testing works well here: change only your headline, leave everything else untouched, and track search appearances and profile views for two weeks against your usual baseline. If the numbers improve, keep it. If they drop, roll back and try again, since isolating one variable at a time is the only reliable way to attribute a change.
Check your analytics under “Who’s viewed your profile” and “Search appearances” weekly rather than daily. Daily numbers are noisy; weekly trends tell you what’s actually working.
How do you customize your LinkedIn URL for better branding?
Your default LinkedIn URL is a string of random numbers and letters tacked onto your name. It looks unfinished on a résumé, a business card, or an email signature, and it does nothing for search visibility. Customizing it takes about two minutes and pays off every time someone shares your profile link.
To change it, open your profile, click “Edit public profile & URL” in the top right panel, and edit the custom URL field. LinkedIn allows letters, numbers, and hyphens, generally between 3 and 100 characters. The cleanest format is your first and last name with no numbers: linkedin.com/in/janesmith. If that exact string is taken, add a middle initial or your profession before resorting to random digits, which look careless.
A clean URL matters for three practical reasons. It reads professionally on a printed résumé or email signature, where a jumble of numbers looks like an error. It’s easier to remember and share verbally, which matters when you’re networking at events or on calls. And it very slightly reinforces your personal brand every time it appears, particularly if your name is your professional identity, as it is for consultants, freelancers, and executives building an external reputation.
One caveat: changing your URL once you’ve already shared it widely (on a résumé, in email signatures, on a business card) means old links may break. Set your custom URL early, ideally the same session you first optimize your profile, so you only need to update it in one direction going forward.
How do you request LinkedIn recommendations that actually help?
A written recommendation is one of the few elements on your profile that isn’t self-authored, which is exactly why it carries weight. Recruiters and hiring managers read recommendations as a credibility check against everything else you’ve written about yourself.
The mistake most professionals make is asking too broadly: “Would you write me a recommendation?” produces vague, generic praise that doesn’t reinforce any specific claim. Ask instead for a recommendation that speaks to a specific project, skill, or result. If you led a cost-reduction initiative, ask the manager who saw it happen to mention that specific outcome. If a client praised your turnaround time on a project, ask them to say so directly.
Timing matters. The best moment to ask is right after a project wraps or a role ends, while the details are still fresh in the other person’s mind. Waiting six months usually produces a vaguer, shorter recommendation because memory has faded.
When you request one, offer a short prompt: two or three bullet points reminding them what you worked on together and what result mattered most. Most people are happy to write a recommendation but appreciate not having to reconstruct the details from scratch. Aim for four to six recommendations spread across different roles and relationships, managers, clients, peers, rather than five from the same job, which reads as one-dimensional. Reciprocate when it’s genuine; writing a thoughtful recommendation for someone else often prompts them to write one back.
How do you use multimedia to strengthen your experience section?
Text-only Experience entries are easy to skim past. Attaching multimedia, a project deck, a demo video, a published article, a portfolio link, gives a recruiter something concrete to click into, and it’s one of the most underused features on the platform.
Under each role or in the dedicated Featured section, you can attach documents, images, links, and videos directly. A project manager might attach a redacted project timeline or a before-and-after dashboard screenshot. A designer might link a portfolio piece. A sales professional might attach a case study PDF or a short client testimonial video. A public speaker or trainer might embed a clip of an actual talk.

The value isn’t decorative. A recruiter who sees an actual work sample forms a stronger impression in seconds than one reading another paragraph of prose. It also differentiates you from the majority of profiles that list only text, since most professionals never touch this feature at all.
Keep the volume manageable. Two or three well-chosen pieces per role, the strongest evidence of your best work, outperform five mediocre attachments that dilute the impact. Make sure anything you attach is either public or explicitly cleared for sharing; client work, in particular, often carries confidentiality obligations that override the temptation to showcase it.
Where else should keywords appear beyond the headline?
Most professionals stop keyword optimization at the headline, which is a mistake. LinkedIn’s search algorithm scans your entire profile, and recruiter search tools weight several fields beyond the headline almost as heavily.
Your Experience section should include the exact job titles and tools recruiters search for, not just internal company jargon. If your official title was “Team Lead, Client Success” but the industry standard term is “Customer Success Manager,” include both somewhere in that entry, since using terms pulled directly from job postings and LinkedIn’s own autocomplete function improves how often you surface in relevant searches.
Your Skills section functions almost like a tag cloud for search purposes. Every skill you add is indexed, so include both the formal industry term and any common synonym recruiters might type (“SEO” and “search engine optimization,” “PM” and “project management”). Your About section should carry three to five of your highest-priority keywords, worked naturally into sentences rather than stacked at the end like a list.
Education and certification entries also carry keyword weight, particularly for regulated or credentialed fields, law, accounting, engineering, where the exact designation (CPA, PMP, PEng) is frequently a direct recruiter filter. Scattering your core terms across headline, About, Experience, and Skills, rather than concentrating them in one field, is what actually moves your search ranking.
Which underused profile sections deserve more attention?
Featured, Accomplishments, and Certifications sit lower on most profiles, and most professionals never touch them, which is exactly why filling them out well creates separation from the crowd.
The Featured section lets you pin your strongest content to the top of your profile, above your Experience history. Pin a well-performing post, a media mention, a portfolio piece, or a link to a talk you gave. It’s prime real estate that most profiles leave empty.
Accomplishments covers publications, patents, courses, honours, and languages, categories that rarely fit naturally into an Experience bullet but often matter to a hiring decision. A published article in a trade journal or a language you speak fluently can be a genuine differentiator for certain roles, particularly in consulting, international business, or technical fields.
Certifications deserve more care than most people give them. Add the issuing organization, the date earned, and, where relevant, a credential ID, since some recruiter searches filter specifically on verified certification data. An outdated or expired certification listed without a renewal date can also raise questions, so keep this section current rather than treating it as a one-time entry.
None of these sections alone will transform your profile. Together, filled out with real substance rather than left blank, they signal a level of completeness that separates a well-maintained profile from one that was set up once and forgotten.
How should you tailor your profile for a specific industry or role?
A generic profile optimized for “general professional visibility” underperforms one built for a specific target role, because recruiter search behaviour varies sharply by industry.
In technical fields like software engineering, recruiters search on specific languages, frameworks, and tools (Python, Kubernetes, React) far more often than on soft skills, so your Skills and Experience sections should read almost like a technical inventory, precise and current. Advice on aligning résumé language with recruiter search terms in the software industry applies just as directly to LinkedIn’s Skills field.
In client-facing or executive roles, sales, consulting, senior management, recruiters search more on outcomes and scope: revenue figures, team size managed, market segments led. Your headline and About should foreground scale and results over technical specifics.
In regulated or credentialed industries, healthcare, law, finance, exact licensing terms and jurisdiction matter enormously; a recruiter filtering for “Registered Nurse, Ontario” won’t find you if your profile only says “healthcare professional.” Match the precise, official terminology your industry actually uses in job postings, even when it feels less creative than a broader description. Precision beats personality in a keyword search every time.
When should you DIY your LinkedIn profile versus hiring help?
DIY works well for straightforward updates: refreshing a headline, cleaning up Skills, tightening a few bullets. It starts to fall short when you’re navigating a complex career pivot, positioning for an executive-level role, or simply don’t have the hours to do the work justice.
A professional service adds outside perspective on industry framing, sharper proof points pulled from your actual results, and multiple rounds of revision most people won’t give themselves. When evaluating a provider, look for clear deliverables, a defined revision process, and real client outcomes rather than vague promises. The right help doesn’t replace your judgment; it sharpens what you already know about your own career.
— Professional
How Professional Resumes can help you finish the job
DIY edits get you most of the way there, but a done-for-you rewrite closes the gap faster, particularly if you’re short on time or repositioning for a role that doesn’t match your current title. Some professional services build LinkedIn profiles around the same hook, proof, and keyword structure covered here, doing the writing, the framing, and the revisions for clients.
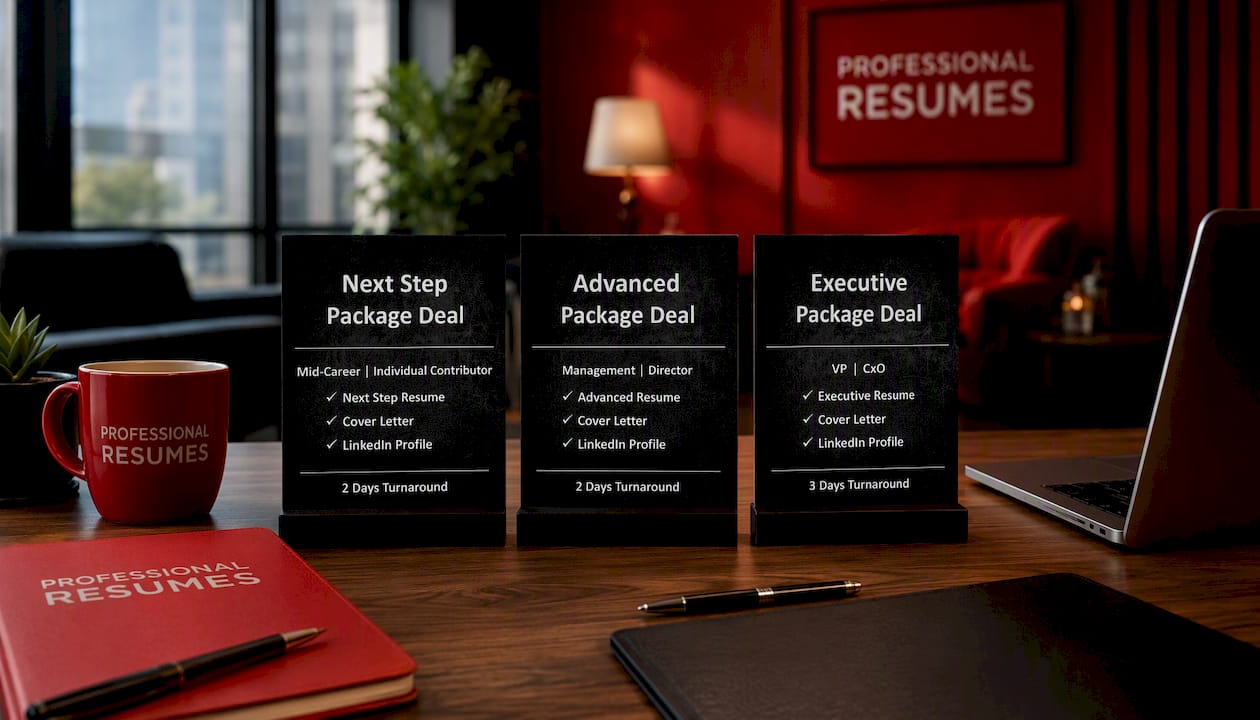
The Next Step Package Deal suits a quick, professional refresh, ideal if your profile is mostly solid but the headline and About section need a rewrite. The Advanced Package Deal goes deeper, with fuller messaging work and multiple revision rounds for mid-career professionals repositioning for a new industry or level. The Executive Package Deal is built for senior leaders who need tailored personal branding across their executive profile, consultation included.
These packages typically include a consultation, drafted content, and revision rounds to ensure the final profile reflects the client’s voice and is supported by evidence. Start by reviewing which package matches your current career stage on the Professionalresumes site.
Sources
- How to write a LinkedIn summary that helps you stand out
- Job Seekers LinkedIn: Complete Profile Guide
- Optimizing LinkedIn profile guidance (OnTheMoveCanada)
- How to write a LinkedIn summary that stands out